Controller Interactions
In this section, we will learn how to add interaction to your Holoboard AR scene!
Holoboard Controller
The Holoboard Controller is a 3 DoF controller with 5 programmable buttons as shown below.

Adding the Holoboard Controller To Your Scene
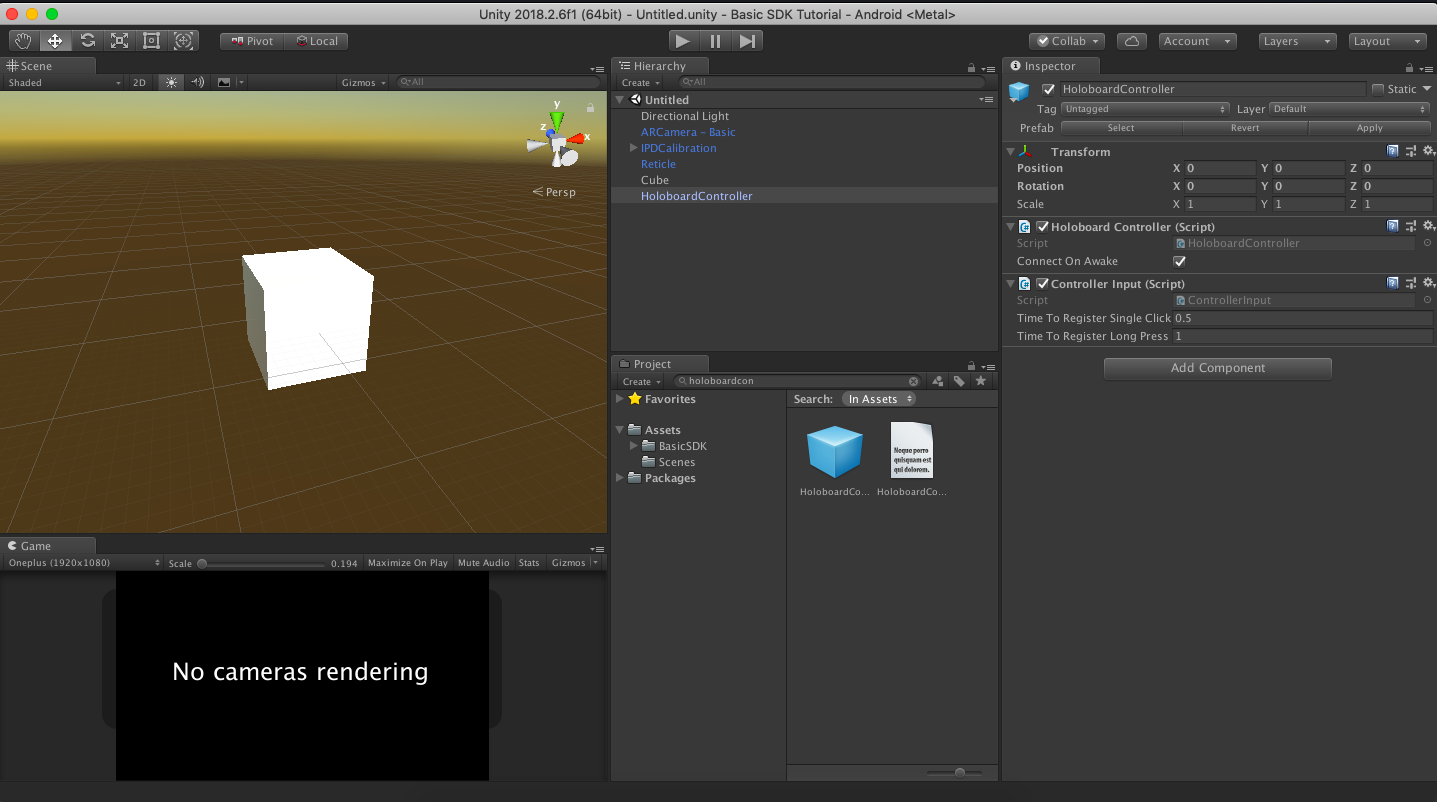
In order to use Holoboard Controller in any scene, drag and drop the HoloboardController prefab found at Assets->BasicSDK->Core->Prefabs->Core into the scene, if not done already.
Enable Connect On Awake to initiate connection with the controller.
Alternatively, you can call HoloboardController.Instance.InitiateConnection() via script if you want to manually initiate connection with the Controller during runtime.
Obtaining Holoboard Controller Orientation
Since the Holoboard Controller is a 3 DoF device, you can obtain its rotation in 3D space in realtime. You can obtain the quaternion representation of its rotation at any point in time by -
Quaternion controllerOrientation = HoloboardController.Instance.GetControllerOrientation();
Adding Interactions To GameObjects
The Holoboard Controller interactions uses callbacks based on standard C# Actions and Events. In order to use any of these interactions, any script can subscribe to these Actions and implement functions based on the information provided by the callback. This is achieved by the ARInteractible class.
If you simply want the standard interactions of Grab, Rotate, Scale, Move, etc. head to this section here
Let's see how we can add custom interactions to our Holoboard AR scene.
For Canvas Based UI Elements
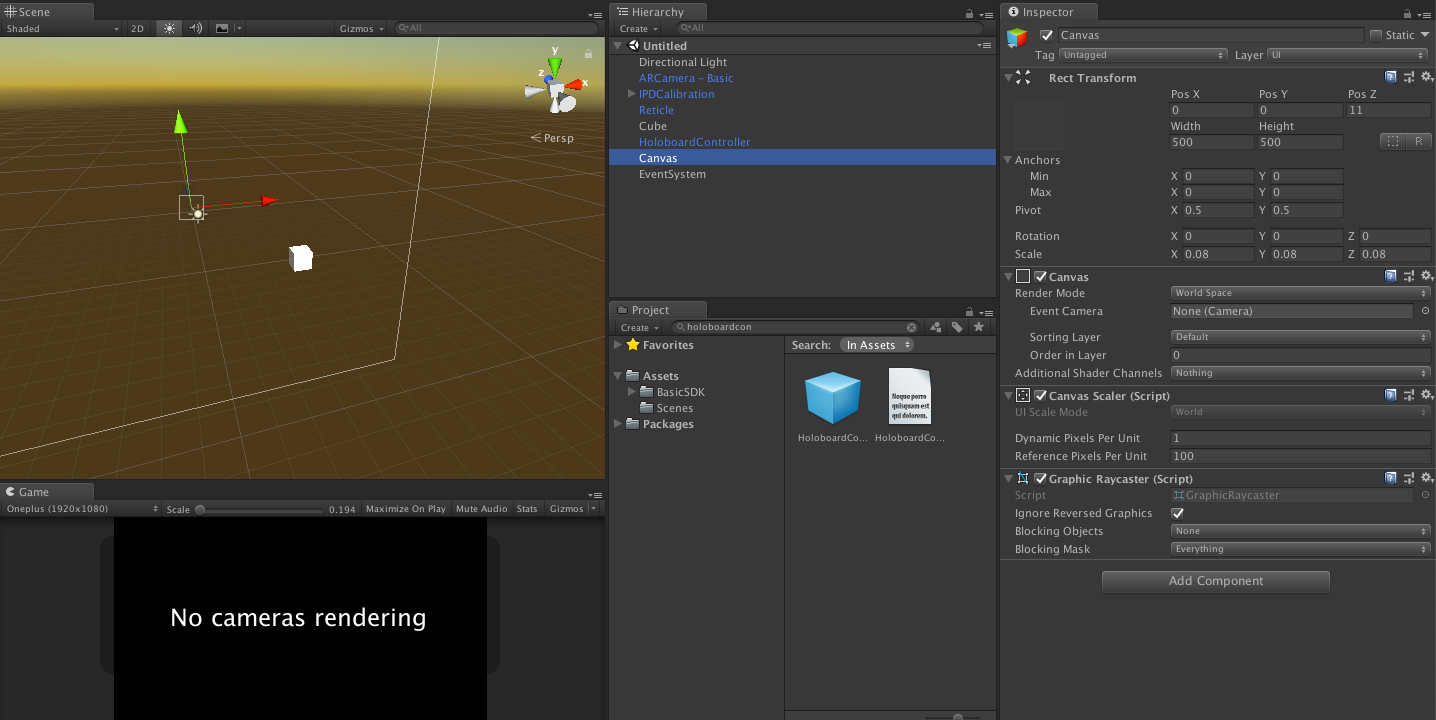
Create a Canvas via Game Object -> UI -> Canvas.
Set the Canvas Component’s Render Mode to World Space in the Inspector.
Move the Canvas to a location in your scene, usually it’s helpful to set the:
- Scale to roughly (0.08 , 0.08, 0.08)
- Width and Height to 500
- Pos Z (the distance from the user) to 11
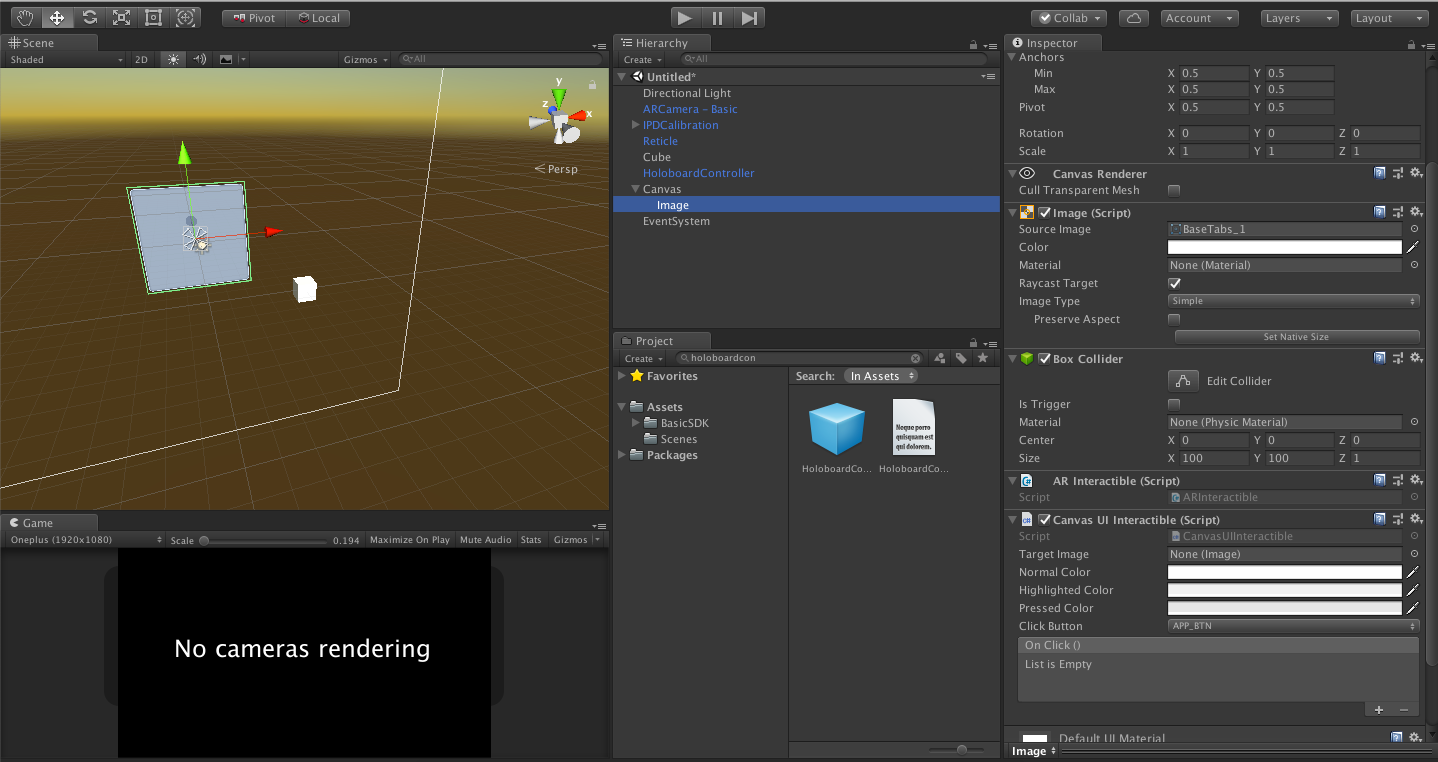
Add a gameobject to the Canvas that will act as a Button. Let's add an Image by selecting the Canvas, clicking on Add Component and then Image.
Make sure the object has a 3D Collider of some kind by selecting the gameObject just added under the Canvas, and clicking on Add Component and then Box Collider, Sphere Collider, or whichever you prefer.
- Scale the 3D Collider to cover the entire GameObject.
Add the ARInteractible component by selecting the gameObject just added under the Canvas, and clicking on Add Component and then ARInteractible.
Add the Canvas UI Interactible component by selecting the gameObject just added under the Canvas, and clicking on Add Component and then Canvas UI Interactible.
You can use the On Click event in the inspector provided by the Canvas UI Interactible to add your interaction.
For Other Objects
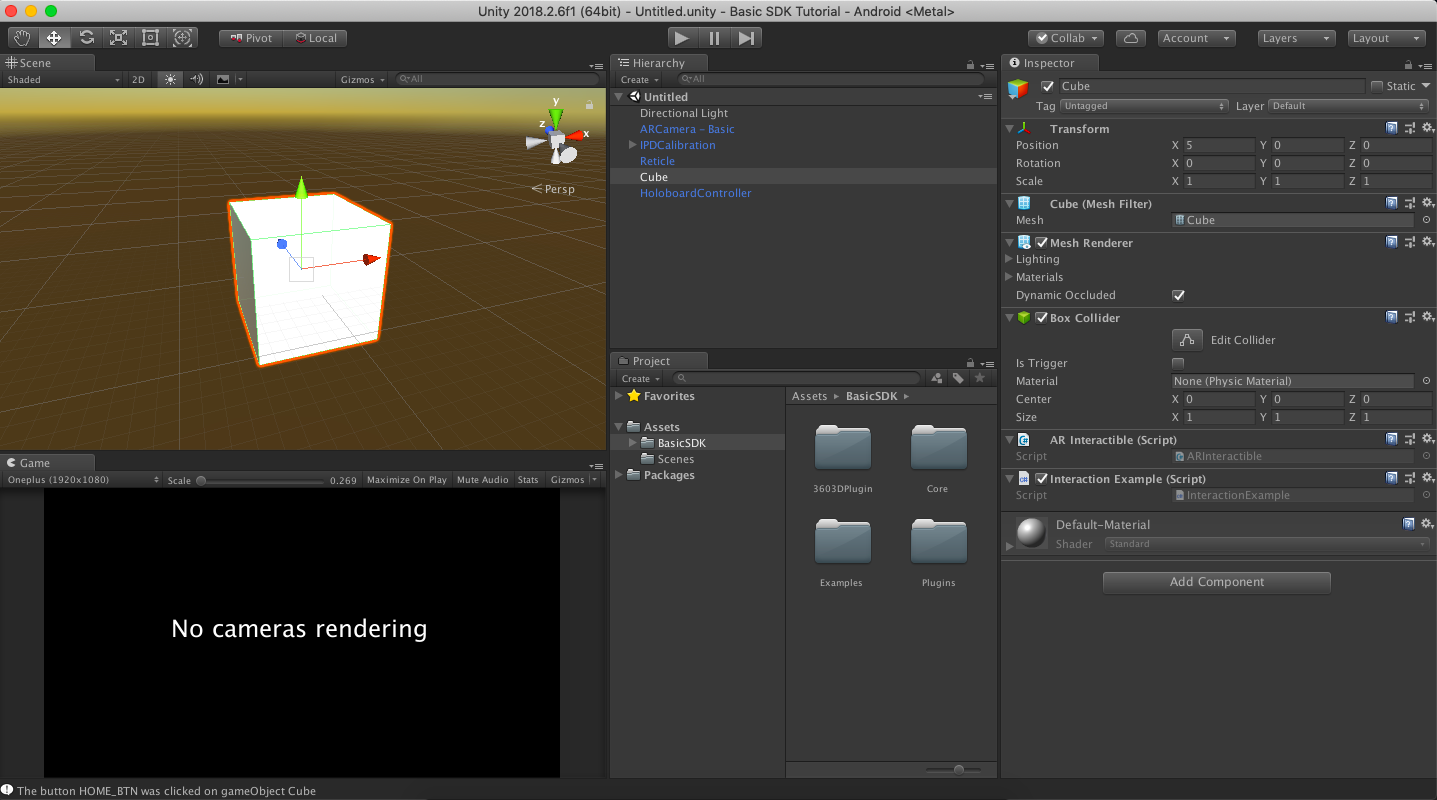
Make sure the object has a 3D Collider of some kind by selecting the game object, and clicking on Add Component and then Box Collider, Sphere Collider, or whichever you prefer.
- Let's add these components to the Cube we added in our Hello World project.
Add the ARInteractible component by selecting the game object, and clicking on Add Component and then ARInteractible.
Create and Add a new script by selecting the game object, clicking on AddComponent, and typing a name for a script.
- For example, let's name this script InteractionExample.
In the void OnEnable() function of your script, subscribe to the Actions that you want to implement from the attached ARInteractible. You can find the complete list of these Actions in the ARInteractible class under the Events tab. We also need to unsubscribe to these subscribed events in void OnDisable() function to avoid any runtime errors.
- For example, let's subscribe to OnSingleClickConfirm to implement when a button on the controller is pressed.
- We then print on the console the name of the button that was pressed and the gameObject this script was attached to.
- Moreover, we compare the argument button in the SingleClickConfirmCalled function to the HOME_BTN button where we can then add our own code.
- Copy and paste the following code to the InteractionExample script.
/**Example to use ARInteractible to add interactions to gameObjects.**/

using UnityEngine;
using TesseractBasic; //TesseractBasic namespace

public class InteractionExample : MonoBehaviour {

    //Reference to the ARInteractible script attached to this gameObject.
    private ARInteractible interactible;

    void OnEnable ()
    {

        //Getting the reference to the ARInteractible script attached to this gameObject.
        interactible = GetComponent<ARInteractible> ();

        //Subscribe to OnSingleClickConfirm event from ARInteractible.
        interactible.OnSingleClickConfirm += SingleClickConfirmCalled;
    }

    //This function will be called whenever the SingleClickConfirm event will be invoked.
    //The arugment <button> tells us which button was clicked.
    void SingleClickConfirmCalled (CONTROLLER_BUTTON button)
    {

        Debug.Log ("The button " + button + " was clicked on gameObject " + gameObject.name);

        if (button == CONTROLLER_BUTTON.HOME_BTN) {
            //We know the HOME_BTN was clicked once.
            //Do Something Here.
        }
    }

    void OnDisable ()
    {

        //Checking for null reference
        if (interactible != null)

            //Unsubscribe to OnSingleClickConfirm event from ARInteractible.
            interactible.OnSingleClickConfirm -= SingleClickConfirmCalled;
    }
}
The function SingleClickConfirmCalled in above code snippet will be executed when the user is gazing at this gameObject and the user then clicks a button on the controller.
You can find more detailed example in the MidLevel_InteractibleExample gameObject in the BasicExample scene.
Global Interactions
In this section, we will use direct global callbacks from the ControllerCallbacks class to add interactions that are independent of gameObjects. These interactions are useful for cases when you want to control the application state itself, instead of any gameObject, such as Play / Pause, Volume and Brightness Control, Recentering, etc.
Create an Empty GameObject anywhere in the scene by going to the menu GameObject -> CreateEmpty.
Create and Add a new script to this EmptyGameObject and selecting the empty game object, clicking on AddComponent, and typing a name for a script.
- For example, let's name this script GlobalInteractions.
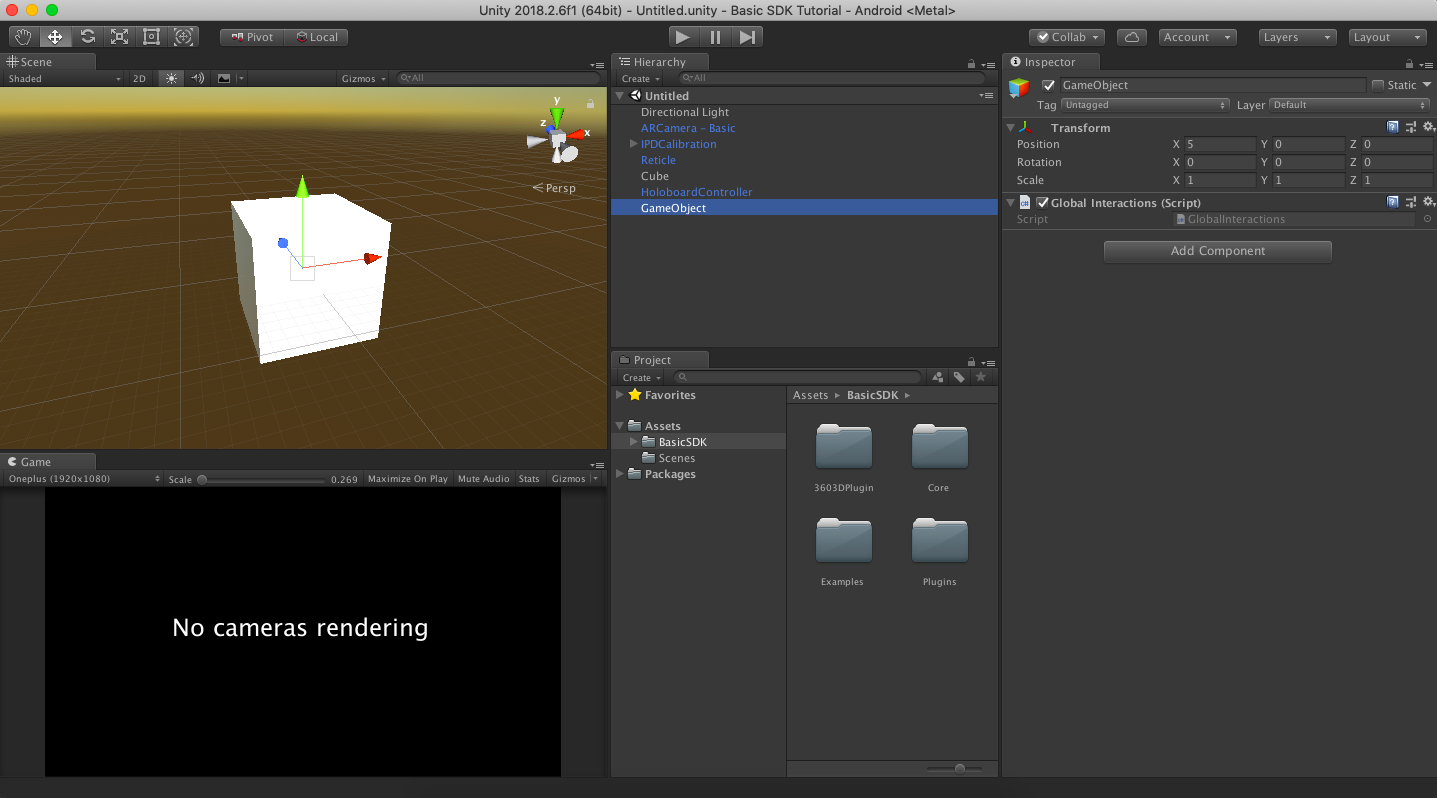
The Actions for the global callbacks are located in the ControllerCallbacks static class. In the void OnEnable() function of your script, subscribe to the Actions that you want to implement from the ControllerCallbacks class by referencing it. You can find the complete list of these Actions in the ControllerCallbacks class under the Events tab. We also need to unsubscribe to these subscribed events in void OnDisable() function to avoid any runtime errors.
- For example, let's subscribe to OnButtonSingleClickConfirm to implement what happens when a button on the controller is pressed.
- We then print on the console the name of the button that was pressed.
- Moreover, we compare the argument button in the ButtonSingleClickConfirmCalled function to the VOL_UP button where we can then add more custom functionality.
- Copy and paste the following code to the GlobalInteractions script.
/**Example to use ControllerCallbacks class to add global interactions.**/

using UnityEngine;
using TesseractBasic;

public class GlobalInteractions : MonoBehaviour {

    /**Example to use ControllerCallbacks class to add global interactions.**/

    void OnEnable ()
    {
        //Subscribe to OnButtonSingleClickConfirm event from ControllerCallbacks class.
        ControllerCallbacks.OnButtonSingleClickConfirm += ButtonSingleClickConfirmCalled;
    }

    //This function will be called whenever the OnButtonSingleClickConfirm event will be invoked.
    //The arugment <button> tells us which button was clicked.
    void ButtonSingleClickConfirmCalled (CONTROLLER_BUTTON button)
    {

        Debug.Log ("The button " + button + " was clicked");

        if (button == CONTROLLER_BUTTON.VOL_UP) {
            //We know the VOL_UP was clicked once.
            //Logic to decrease the volume of the game
        }
    }

    void OnDisable ()
    {

        //Unsubscribe to OnButtonSingleClickConfirm event from ControllerCallbacks class.
        ControllerCallbacks.OnButtonSingleClickConfirm -= ButtonSingleClickConfirmCalled;
    }
}
The function ButtonSingleClickConfirmCalled above code will be executed when the user clicks a button on the controller irrespective of the user's gaze or the application state.
You can find more detailed example in the LowLevel_InteractibleExample gameObject in the BasicExample scene.
You have successfully learned how to add interactions to your Holoboard project!
